Every WordPress site in the world has a login page at the same address.
Type /wp-login.php after any WordPress domain and you will find it. No guessing required. Automated bots know this. They exploit it constantly — sending thousands of username and password combinations against that single predictable URL, probing for a combination that works.
This type of attack is called a brute-force attack, and it is the single most common attack vector against WordPress websites. It requires no technical sophistication. The attacker does not need to find a vulnerability in your plugins or trick you into clicking a link. They just need to try enough passwords until one works.
Most WordPress sites have no protection against this at all. The default WordPress installation places no limit on how many times someone can attempt to log in. A bot can try one million combinations overnight and WordPress will process every single one without complaint.
UltraGuard’s Login Protection suite fixes this with two complementary modules — Login Limiter (brute-force detection, lockouts, and session management) and Login URL Protection (hiding your login page entirely from automated scanners). Together, they cover every angle of login-based attacks.
Both are free. Both are active by default after installation.
Part 1: Login Limiter — Stopping Brute-Force Attacks
How a Brute-Force Attack Works
Imagine your WordPress admin password is Summer2024. An attacker running a brute-force tool starts systematically trying passwords. They try 123456, password, admin, wordpress, letmein, then they move through a dictionary of common words, then common words with numbers appended. Eventually they reach Summer2024.
On an unprotected site, this could happen overnight. On a site with Login Limiter active, it cannot happen at all — because after a small number of failed attempts from the same IP address, that IP is locked out and cannot try again for a configurable period.
How Login Limiter Works
UltraGuard’s Login Limiter hooks into WordPress’s authentication system at the earliest possible point — before the login form even renders. Every failed login attempt is recorded with the IP address, the username attempted, and a timestamp.
When the number of failed attempts from a single IP exceeds your configured threshold within a time window, that IP is locked out. A locked-out IP that tries to access the login page receives a 403 Access Denied response before WordPress processes any credentials — the login form never loads, the password is never tested.
A successful login from the same IP clears the failed attempt counter for that address (optionally — this is configurable).
The entire flow runs on your server, with no third-party service required.
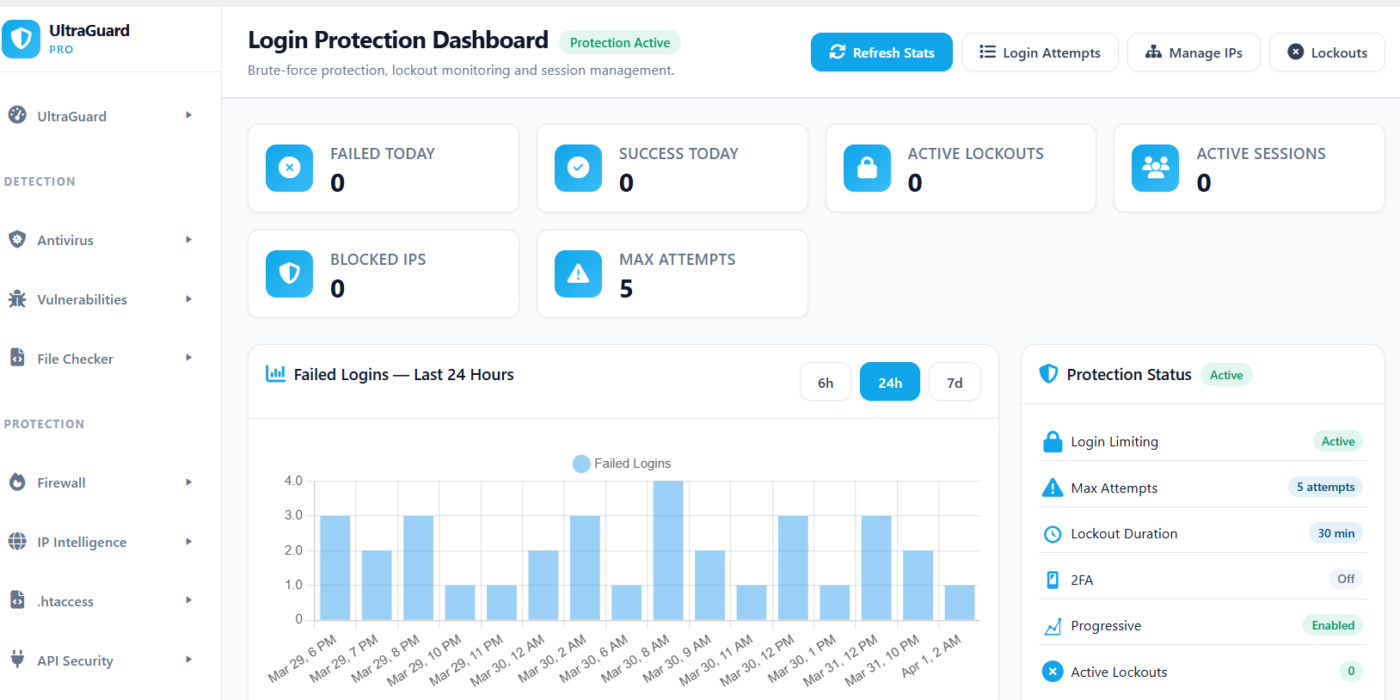
The Five Core Settings
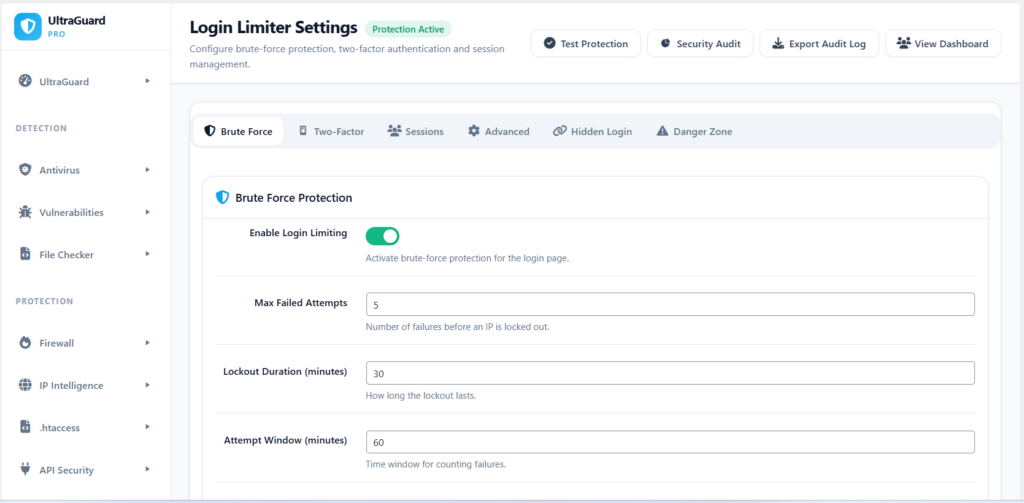
Maximum Failed Attempts (default: 5) The number of failed logins from a single IP before a lockout is triggered. Five is a sensible default — generous enough that a legitimate user who misremembers their password is not locked out, strict enough to stop any automated attack dead.
You can set this as low as 1 (maximum security) or as high as 20. For most sites, 3–5 is the right range.
Lockout Duration (default: 30 minutes) How long a locked-out IP must wait before it can try again. 30 minutes means an attacker would need 60 years to try one million passwords at 5 attempts per lockout. You can configure this anywhere from 1 minute to 24 hours (1440 minutes).
Attempt Window (default: 60 minutes) The rolling time window in which failed attempts are counted. If an IP makes 3 failed attempts, waits 90 minutes, then makes 3 more — and your window is 60 minutes — those are two separate groups. Only the most recent window counts. This prevents attackers from slowly drizzling attempts over days to stay under the threshold.
Progressive Lockout (default: off) When enabled, the lockout duration doubles with each repeat offence — up to a maximum of 8 times the base duration. An IP that has been locked out before gets locked out for twice as long the next time, then four times as long, then eight times, capping at 8× the base.
With a base of 30 minutes, the progression looks like:
- First offence: 30 minutes
- Second offence: 60 minutes
- Third offence: 2 hours
- Fourth offence: 4 hours
- Fifth offence and beyond: 4 hours (8× cap)
This makes persistent attackers progressively more expensive to operate while keeping one-time mistakes reasonable.
Hide Login Error Details (default: on) By default, WordPress tells you exactly what went wrong at login — “Invalid username” confirms the username does not exist, and “The password you entered for username X is incorrect” confirms the username does exist. An attacker can use these messages to build a confirmed list of valid usernames to target.
When this setting is on, UltraGuard replaces all specific error messages with a single generic response: Error: Invalid credentials. Please try again. — revealing nothing about whether the username or password was the problem.
Progressive Lockout in Detail
The progressive lockout system works by counting how many times a specific IP has been locked out in its history — not just in the current window. Every previous lockout for that address is factored into the duration calculation.
The multiplier is capped at 8× to prevent absurdly long lockouts that could create a persistent denial-of-service situation for a legitimate user whose IP address is being spoofed or shared. At 8× a 30-minute base, the maximum lockout is 4 hours — painful for an attacker but recoverable for a legitimate user who contacts support.
Example: An attacker running an automated tool hits your site repeatedly across several days. Their first lockout is 30 minutes, so they wait and try again. Their second lockout is 60 minutes. By their fourth lockout they are waiting 4 hours between attempts. The attack becomes economically impractical long before it could succeed.
Email Alerts on Lockout (default: on)
Every time a lockout is triggered, UltraGuard sends an email to your admin address with:
- The locked-out IP address
- The username that was attempted
- The number of failed attempts that triggered the lockout
- The lockout duration
- A direct link to the Lockouts management page
This means you know in real time when someone is attacking your login page — you do not have to check a dashboard or run a report. The alert arrives in your inbox, usually within seconds of the lockout being triggered.
CAPTCHA: A Challenge Attackers Cannot Automate
Beyond lockouts, UltraGuard can add a CAPTCHA challenge to your login form. CAPTCHA adds a human-verification step that automated bots cannot complete — they may be able to try passwords at scale, but they cannot solve visual or behavioural challenges the way humans can.
UltraGuard supports three CAPTCHA providers:
Cloudflare Turnstile (recommended) — Cloudflare’s privacy-friendly CAPTCHA alternative. In most cases, Turnstile is invisible to legitimate users — it analyses browser behaviour in the background and only shows a challenge when it is uncertain. Most humans pass without seeing anything at all. Bots fail silently or face a visible challenge.
Google reCAPTCHA v2 — the classic “I’m not a robot” checkbox that most people recognise. Requires users to tick a box, and sometimes complete an image selection challenge. More visible than Turnstile but widely trusted and understood.
Google reCAPTCHA v3 — invisible to users entirely. Instead of showing a challenge, it assigns every login submission a score from 0.0 (almost certainly a bot) to 1.0 (almost certainly human). You configure a minimum score threshold (default 0.5) — submissions below the threshold are rejected as automated.
Smart CAPTCHA triggering: Rather than showing the CAPTCHA on every login attempt, UltraGuard can be configured to only show it after a certain number of failed attempts from the same IP (default: after 3 failures). This means legitimate users who type their password correctly the first time never see a CAPTCHA at all — only suspicious IPs that have already shown suspicious behaviour are challenged.
IP Management: Whitelist, Blocklist, and Lockout Management
The Login Limiter maintains its own IP management system, separate from the main Firewall module.
Whitelist (Allowed IPs): IPs on the whitelist are never subject to lockouts or CAPTCHA, regardless of how many failed attempts they make. Use this for your office IP address, your home IP, or any other address that should always have unrestricted login access. If a whitelisted IP is somehow locked out (for example, because it was added after a lockout was already in place), the whitelist bypass takes effect immediately on the next request.
Blocklist (Blocked IPs): IPs on the blocklist are permanently denied access to the login page — not temporarily locked out, but permanently blocked until you remove them. Use this for IPs that have repeatedly attacked your site and that you want to ban indefinitely.
Lockouts page: Shows all currently active lockouts — which IP addresses are locked out, how many failed attempts triggered the lockout, and when the lockout expires. You can manually release any lockout from this page, which is useful when a legitimate user has accidentally locked themselves out.
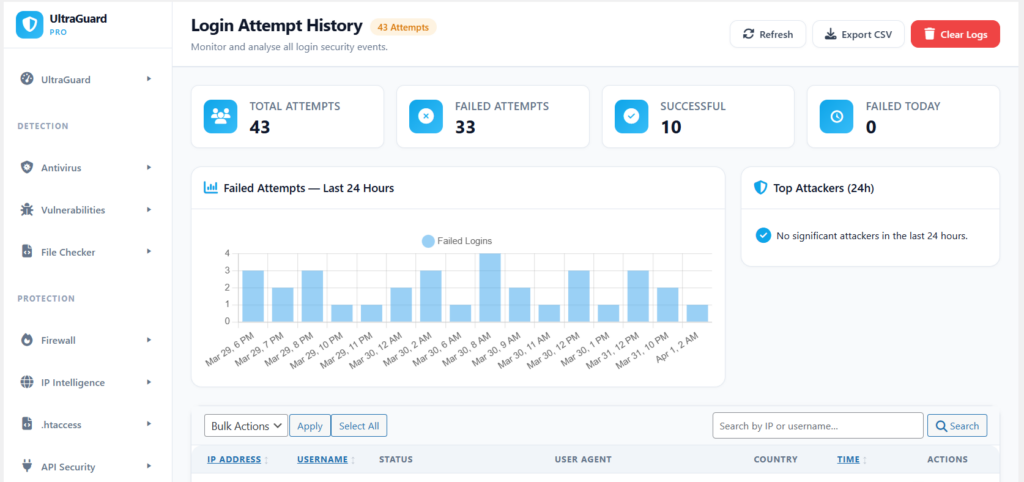
Login Attempts log: A complete searchable history of every login attempt — successful, failed, and locked out — with IP address, username, country, user agent, and timestamp. This is your evidence trail for investigating suspicious activity.
Session Management
Beyond the login page itself, Login Limiter provides controls over active sessions.
Single Session Only (default: off): When enabled, a user can only be logged in from one device at a time. If they log in from a second device, the first session is terminated automatically. This prevents credential sharing and limits the damage from stolen session tokens — an attacker who steals a session cookie cannot use it if the legitimate user is already logged in.
Session Timeout (default: disabled): Automatically logs users out after a configurable period of inactivity. A timeout of 60 minutes means a user who walks away from their computer without logging out is automatically signed out after an hour of no activity. Useful for sites with sensitive data or shared computers.
User Activity Tracking (default: on): Logs login and logout events per user — who logged in, when, and from what IP. This activity trail is visible in the Audit Log module and feeds into compliance reports.
The Protection Score
The Login Limiter dashboard includes a live Protection Score (0–100) and letter grade (A–F) calculated from your current settings. The score is weighted as follows:
| Setting | Points |
|---|---|
| Login limiting enabled | 25 |
| Max attempts ≤ 5 | 15 |
| Lockout duration ≥ 15 minutes | 15 |
| Hide login error details | 10 |
| Two-factor authentication enabled | 20 |
| CAPTCHA enabled | 10 |
| Progressive lockout enabled | 5 |
A score of 90+ earns Grade A. 75–89 is Grade B. 60–74 is Grade C. 40–59 is Grade D. Below 40 is Grade F.
With the defaults enabled (login limiting on, max 5 attempts, 30-minute lockout, hide errors on), your starting score is 65 — Grade C. Enabling CAPTCHA brings it to 75 (Grade B). Adding 2FA takes it to 95 (Grade A).
Part 2: Login URL Protection — Hiding Your Login Page
The Problem With a Predictable Login URL
Every WordPress site in the world can be found at /wp-login.php. This is public knowledge. Every bot, every automated scanner, every brute-force tool starts its attack here because it knows exactly where to look.
Even with Login Limiter active, every attempt to access /wp-login.php generates server load, consumes database resources, and creates log entries. High-volume attacks against the login page can affect server performance for legitimate visitors.
The deeper problem is that bots can probe your login page forever at low rates — slow enough to avoid triggering rate limits, distributed across enough IPs to avoid triggering lockouts — and you would never know until a password was eventually guessed.
Login URL Protection solves this by making your login page disappear entirely.
How It Works
UltraGuard replaces your /wp-login.php URL with a secret custom path of your choosing. For example, instead of /wp-login.php, your login page might be at /access-k7m4p2/ — a path that only you know.
The old /wp-login.php URL still technically exists on your server, but when someone visits it, they do not get a login form. Instead, they get one of three responses — your choice:
- 404 Not Found (default) — the page appears to not exist at all. Bots probing for your login page find nothing and move on.
- Redirect to homepage — the visitor is silently redirected to your site’s homepage with no error message.
- Redirect to custom URL — you specify exactly where they are sent.
Meanwhile, your secret login URL works exactly like the old one — the same WordPress login form, the same functionality, the same compatibility with everything that uses WordPress’s login system. The only difference is the URL.
What Happens to Bots
When a bot scans your site looking for /wp-login.php:
- It hits
/wp-login.php— it gets a 404 - It records your site as “login page not found”
- It moves on to the next target
The bot never even attempts a password. The login page is simply not there as far as the bot is concerned.
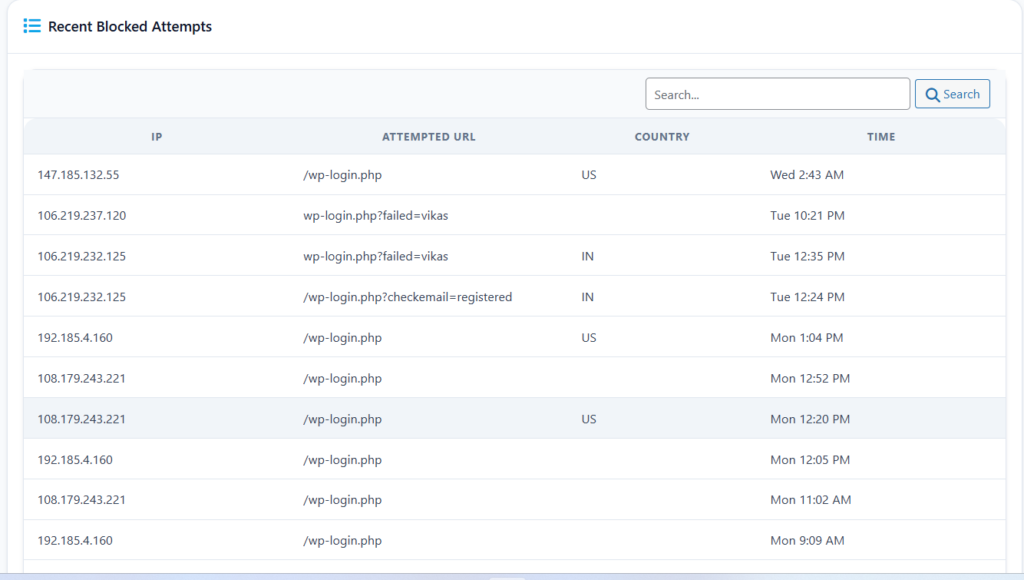
Every hit to the old /wp-login.php URL is logged — including the IP address, user agent, country code, and timestamp — so you can see exactly how much probing your site is receiving and from where. The dashboard shows today’s count, this week’s count, and unique IP count over the past 7 days. A 30-day chart shows the trend over time.
Auto-Block Repeat Probers
If the same IP hits /wp-login.php repeatedly, UltraGuard can automatically pass that IP to the Firewall module for blocking. You configure the threshold — for example, after 5 hits from the same IP within an hour — and UltraGuard handles the ban automatically.
This means that even particularly persistent bots, which keep coming back after getting a 404, are eventually added to the firewall blacklist and blocked from your entire site — not just the login page.
How the Secret URL Is Generated
When you enable Login URL Protection and leave the custom path blank, UltraGuard generates a random path for you in the format access-[6 random characters] — for example, access-f7g3k9. You can also set your own custom path, which must be at least 6 characters long using letters, numbers, and dashes.
The secret path is stored in your database. Every internal WordPress URL that would normally point to wp-login.php — password reset emails, admin login redirects, plugin authentication flows — is automatically rewritten to use your secret path instead. You do not need to update anything manually.
Integration With Login Limiter
The two modules are integrated. When someone probes the old /wp-login.php URL, that hit is recorded as a failed login attempt in the Login Limiter’s attempts table, and it counts toward the lockout threshold just like an actual failed password attempt.
This means:
- An IP that repeatedly hits the old login URL accumulates failed attempt counts
- If it crosses the threshold, it gets locked out from the login page entirely
- If auto-block is enabled, it eventually gets banned from the whole site via the Firewall
The two modules share the same IP whitelist — IPs you have marked as trusted bypass both the Login Limiter and the Login URL Protection checks.
All Settings at a Glance
Login Limiter Settings
| Setting | What It Does | Default |
|---|---|---|
| Enable Login Limiting | Master toggle for brute-force protection | On |
| Max Failed Attempts | Failures before lockout (1–20) | 5 |
| Lockout Duration | How long lockout lasts in minutes (1–1440) | 30 |
| Attempt Window | Time window for counting failures in minutes | 60 |
| Progressive Lockout | Double duration per repeat offence, max 8× | Off |
| Email Admin on Lockout | Send alert when lockout is triggered | On |
| Hide Login Error Details | Generic error message instead of specific hints | On |
| Clear Lockout on Success | Release lockout when correct credentials used | Off |
| Single Session Only | One active session per user at a time | Off |
| Session Timeout | Auto-logout after inactivity (minutes, 0=off) | Off |
| Track User Activity | Log login/logout events per user | On |
| Enable CAPTCHA | Show CAPTCHA challenge on login form | Off |
| CAPTCHA After (attempts) | Show CAPTCHA after N failures (0=always) | 3 |
| CAPTCHA Provider | Cloudflare Turnstile / reCAPTCHA v2 / v3 | Turnstile |
| Log Retention (days) | Auto-prune login attempt logs | 30 |
| Custom Login URL Slug | Optional additional login URL rename | Empty |
Login URL Protection Settings
| Setting | What It Does | Default |
|---|---|---|
| Enable Hidden Login | Hide wp-login.php behind a custom secret path | On |
| Custom Login Path Slug | Your secret URL slug (min 6 characters) | Auto-generated |
| Original URL Action | What happens when wp-login.php is visited | 404 Not Found |
| Custom Redirect URL | Where to send visitors (if redirect_custom chosen) | Empty |
| Log Legacy Login URL Hits | Store blocked requests for review | On |
| Auto-block Repeated Hits | Pass repeat probers to firewall blacklist | Off |
| Auto-block Threshold | Hits per hour before auto-block triggers | 5 |
| Notify Admin on Legacy Login Hits | Email alert when old URL is probed | Off |
Five Admin Pages
The Login Protection suite spans five pages in the UltraGuard admin menu.
Login Limiter Dashboard — protection score, grade, live stats (today’s attempts, active lockouts, blocked IPs), and a recent activity feed.
Login Attempts — full searchable log of every login attempt with IP, username, country, status (success/failed/locked), and timestamp.
IP Management — manage your whitelist (trusted IPs) and blocklist (permanently banned IPs). Add individual addresses or CIDR ranges.
Lockouts — all currently active lockouts. Shows which IPs are locked out, the failure count that triggered each one, and the expiry time. Release any lockout manually from this page.
Settings — the full settings panel covering all Login Limiter and Login URL Protection options across five tabs: Protection, Two-Factor, Sessions, Advanced, and Hidden Login.
Both Modules Are Free
The Login Limiter and Login URL Protection modules are both part of UltraGuard’s free tier. Everything described in this article — brute-force protection, progressive lockouts, CAPTCHA, IP management, session controls, URL obfuscation, auto-blocking, email alerts — is available at no cost with no time limit.
Download UltraGuard Free → View All Features →
Summary: What Protects You and How
| Threat | Protection |
|---|---|
| Password guessing by automated bots | Login Limiter — lockout after 5 failures |
| Persistent attackers who keep trying | Progressive lockout — duration doubles each time |
| Slow drip attacks below threshold | Attempt window — rolling counter resets properly |
| Username discovery via error messages | Generic error messages — no hints given |
| Bots finding your login page at all | Login URL Protection — wp-login.php returns 404 |
| Repeated probing of old login URL | Auto-block — pass repeat offenders to firewall |
| Automated scripts that can’t solve CAPTCHAs | Cloudflare Turnstile / Google reCAPTCHA |
| Stolen session tokens used from another device | Single session enforcement |
| Unattended logged-in sessions | Session timeout and auto-logout |
| Admin login from shared or public computers | Activity tracking + session management |
Two free modules. Every angle of login-based attacks covered.
UltraGuard Login Limiter and Login URL Protection are part of the free core of UltraGuard Security Suite v6.7.2. Requires WordPress 5.6+ and PHP 8.1+.